
It's just a few days until Christmas and I found out that I don't have enough christmas tree decorations.
I decided not to panic, and be little creative.
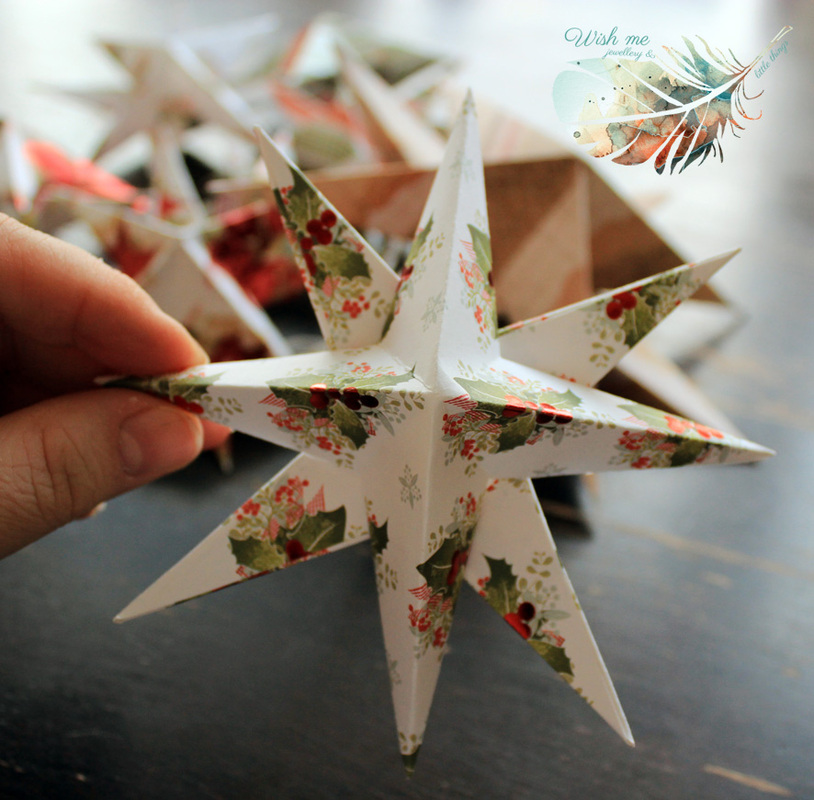
I have a pile of wonderful scrapbook paper so why not to use some? I grabbed a few Christmasy looking ones, tuned christmas melodies and start working. It was easy, inexpensive ( I had all I needed at home) and the result was stunning.
If you want to give it a try with me GET READY :)
You will need:
- water based glue or a hot glue gun ( I used the hot glue gun for my final gluing)
- a pair of scissors
- 2 pcs of paper- square shape ( the size is up to you, depending on how big star you want. The classic copy paper, 80g, also works just great. I used 100g scrapbook paper )
- a pencil
- a needle and some thread
- ribbon ( not necessary, only if you want to give your star more touches :) ss)
I decided not to panic, and be little creative.
I have a pile of wonderful scrapbook paper so why not to use some? I grabbed a few Christmasy looking ones, tuned christmas melodies and start working. It was easy, inexpensive ( I had all I needed at home) and the result was stunning.
If you want to give it a try with me GET READY :)
You will need:
- water based glue or a hot glue gun ( I used the hot glue gun for my final gluing)
- a pair of scissors
- 2 pcs of paper- square shape ( the size is up to you, depending on how big star you want. The classic copy paper, 80g, also works just great. I used 100g scrapbook paper )
- a pencil
- a needle and some thread
- ribbon ( not necessary, only if you want to give your star more touches :) ss)

First of all, prepare your sheets and cut them, so you get the square shape. You need two pieces for each star ( I worked with 10x10cm, 12x12cm and 20x 20cm)
Start folding your paper as shown below, so at the end you will get 8 triangles.
Start folding your paper as shown below, so at the end you will get 8 triangles.

When finished, take your pencil and mark the lines less than in the middle of all sides that goes horizontally and vertically ( NOT diagonally). See step no 5. :) Take scissors and cut from the edge to your pencil mark on all four sides. Then fold each side to the center, so you create 4 points of the star. Put a little bit of glue to every other side of the folded flaps. Pull the unglued side over the glued side and glue it together...

.... so you get this ( step 11. and 12. ) This is just one half of the star. To get the whole star you need to make another half. Repeat steps 1-12. Then glue both halves of the star together and TA-DA :) The simple paper star is born.

To complete it make a hole with the needle in one of the star points and pull in thread. TIP : I used a jump ring just to give it more sophisticated look :) Or you can add a ribbon so it looks more festive.

And here is the final look of my stars. I really couldn't stop making them. I had so much fun. And guess what? The day after I made them I went Christmas shopping and spotted them in one shop. They were selling them in a pack of three. Stars were white and very simple. I just smiled :), what a coinsidence.... But I LOVE MINE :)))


Hope you will have fun making them.
PS1: May your Christmas be merry, bright and white.
PS2: And here is the tutorial I was inspired by.
PS1: May your Christmas be merry, bright and white.
PS2: And here is the tutorial I was inspired by.

 RSS Feed
